SpringBoot与MCP初步整合实战:构建高可用MCP对话服务
随着人工智能的飞速发展,大语言模型(LLM)正在革命性地重塑用户与软件的交互范式。想象一下这样的场景:用户无需钻研复杂的API文档或者在繁琐的表单间来回切换,只需通过自然语言直接与系统对话——"帮我查找所有2023年出版的图书"、"创建一个新用户叫张三,邮箱是zhangsan@example.com"。这种直观、流畅的交互方式不仅能显著降低新用户的学习曲线,更能大幅削减B端系统的培训成本和实施周期,让企业应用变得更为简单和高效。
认识MCP
我这里不粘贴官方的定义,用大白话给大家解释下:MCP就像是AI世界的"万能适配器"。想象你有很多不同类型的服务和数据库,每个都有自己独特的"说话方式"。AI需要和这些服务交流时就很麻烦,因为要学习每个服务的"语言"。
MCP解决了这个问题 - 它就像一个统一的翻译官,让AI只需学一种"语言"就能和所有服务交流。这样开发者不用为每个服务单独开发连接方式,AI也能更容易获取它需要的信息。
如果你是一个后端同学,那么应该接触或听说过gRPC。gRPC通过标准化的通信方式可以实现不同语言开发的服务之间进行通信,那么MCP专门为AI模型设计的"翻译官和接口管理器",让AI能以统一方式与各种应用或数据源交互。
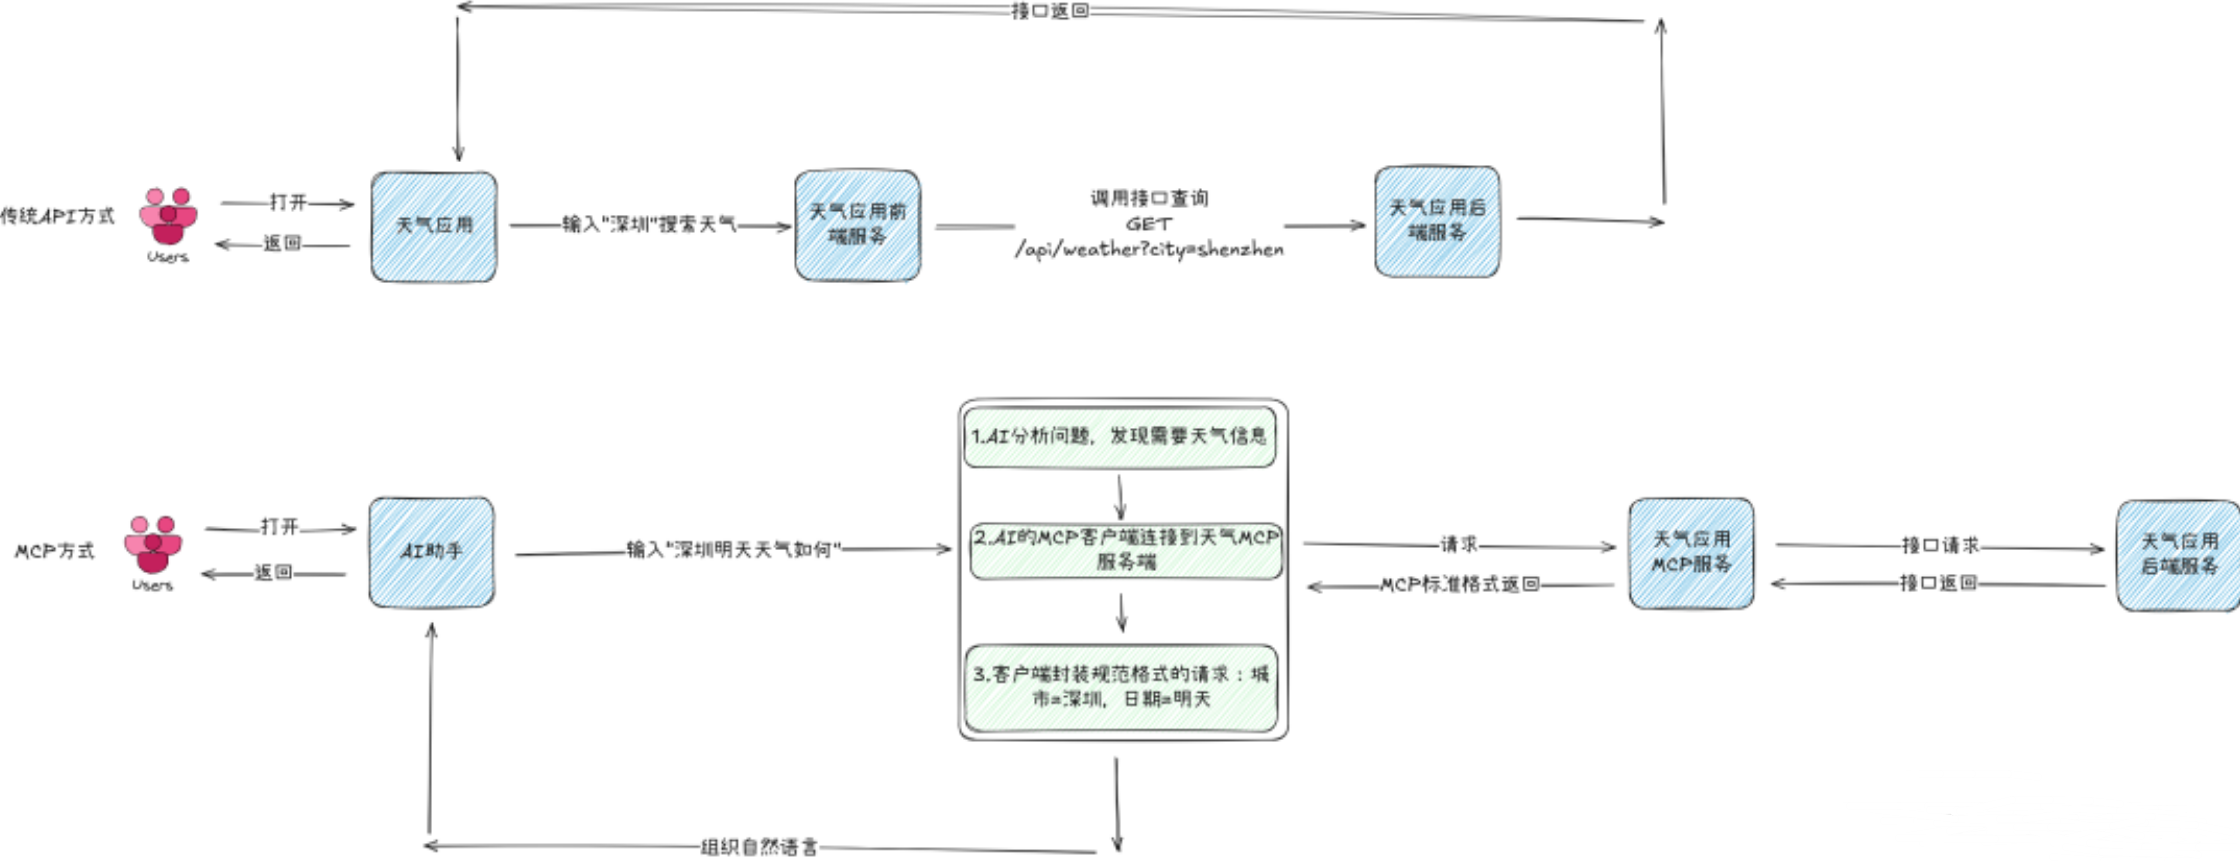
我们假设开发了一个天气服务,用户想要查询深圳的天气,这里分别以传统API方式和MCP方式进行对比:
配置pom.xml
增加lombok依赖 1
2
3
4
5
6<!-- lombok -->
<dependency>
<groupId>org.projectlombok</groupId>
<artifactId>lombok</artifactId>
<optional>true</optional>
</dependency>
JPA
一、配置springboot-data-jpa
1 | <!-- spring-data-jpa --> |
二、创建实体类(Entity)
使用@Entity标记为JPA实体类,并生成无参构造函数。 1
2
3
4
5
6
7
8
9
10
11
12
13
14
15
16
17
18
19
20
21
22
23
24
25
26
27
28
29
30
31
32
33
34
35
36
37
38
39
40
41
42
43
44
45
46
47
48
49
50
51
52
53
54
55
56
57
58
59
60
61
62
63
64
65
66
67
68
69
70
71
72
73
74
75
76
77
78
79
80
81
82
83
84
85
86
87
88
89
90
91
92
93
94
95package com.example.entity;
import jakarta.persistence.*;
import jakarta.validation.constraints.NotBlank;
import lombok.*;
import java.time.LocalDate;
public class book {
private Long id;
private String title;
private String category;
private String author;
private LocalDate publicationDate;
private String isbn;
public String getTitle() {
return title;
}
public void setTitle( String title) {
this.title = title;
}
public String getCategory() {
return category;
}
public void setCategory( String category) {
this.category = category;
}
public String getAuthor() {
return author;
}
public void setAuthor( String author) {
this.author = author;
}
public LocalDate getPublicationDate() {
return publicationDate;
}
public void setPublicationDate( LocalDate publicationDate) {
this.publicationDate = publicationDate;
}
public String getIsbn() {
return isbn;
}
public void setIsbn( String isbn) {
this.isbn = isbn;
}
public book(Long id, String title, String category, String author, LocalDate publicationDate, String isbn) {
this.id = id;
this.title = title;
this.category = category;
this.author = author;
this.publicationDate = publicationDate;
this.isbn = isbn;
}
public book() {
}
}
使用@Entity:标记为 JPA 实体类。
使用@NoArgsConstructor:生成无参构造函数(JPA 强制要求)。
三、创建 Repository 接口
在 Spring Data JPA 中,Repository 接口是数据访问层的核心组件,它通过简单的接口声明即可自动实现常见的 CRUD(增删改查)操作。 定义接口并继承 JpaRepository.
自动继承的方法 通过继承 JpaRepository,接口自动获得以下方法:
3.1. 基础 Repository 接口 * save(entity):保存或更新实体。 * findById(id):根据 ID 查询。 * findAll():查询所有实体。 * deleteById(id):根据 ID 删除。 * count():统计实体总数。
3.2 自定义查询方法
规则:根据方法名自动生成查询 Spring Data JPA 支持通过 方法命名规则 自动生成查询。 格式:findBy + 属性名 + 条件。
示例 1:根据字段查询 1
2
3
4
5
6
7
8
9
10public interface UserRepository extends JpaRepository<User, Long> {
// 精确匹配
User findByUsername(String username);
// 模糊查询(LIKE)
List<User> findByUsernameContaining(String keyword);
// 多条件查询
List<User> findByUsernameAndEmail(String username, String email);
}1
2
3
4
5
6
7
8
9
10
11
12
13
14
15
16
17
18
19
20
21import org.springframework.data.domain.Page;
import org.springframework.data.domain.Pageable;
import org.springframework.data.domain.Sort;
public interface UserRepository extends JpaRepository<User, Long> {
// 按年龄降序查询
List<User> findByAgeGreaterThan(int age, Sort sort);
// 分页查询
Page<User> findByEmail(String email, Pageable pageable);
}
Spring Data JPA 会自动生成 CRUD 实现:
```java
import org.springframework.data.jpa.repository.JpaRepository;
public interface UserRepository extends JpaRepository<User, Long> {
// 自定义查询方法(示例)
User findByEmail(String email);
}
当方法名无法满足复杂查询时,可通过 @Query 直接编写 JPQL 或原生 SQL。
示例 1:JPQL 查询 1
2
3
4
5
6
7
8
9
10
11
12
13
14
15
16
17
18
19
20
21
22
23
24
25
26import org.springframework.data.jpa.repository.Query;
package com.example.repository;
import com.example.entity.Book;
import org.springframework.data.jpa.repository.JpaRepository;
import org.springframework.data.jpa.repository.Query;
import org.springframework.data.repository.query.Param;
import org.springframework.stereotype.Repository;
import java.util.List;
public interface BookRepository extends JpaRepository<Book, Long> {
//根据书名模糊查询
List<Book> findByTitleContaining( String title);
//根据作者查询
List<Book> findByAuthor(String author);
//根据分类查询
List<Book> findByCategory(String category);
}
示例 2:原生 SQL 查询 1
2
List<User> findUsersOlderThan(int age);
3.4 在 Service 层调用 Repository 在业务逻辑层(Service)注入 Repository 并调用方法
1 |
|
四、配置数据库连接
在 application.properties 或 application.yml 中配置数据库:
1
2
3
4
5
6
7
8
9
10# H2 内存数据库配置(示例)
spring.datasource.url=jdbc:h2:mem:testdb
spring.datasource.driver-class-name=org.h2.Driver
spring.datasource.username=sa
spring.datasource.password=
spring.h2.console.enabled=true
# JPA 配置
spring.jpa.hibernate.ddl-auto=update
spring.jpa.show-sql=true
另外在第二步创建实体类的时候,使用了Lombok库的注解来自动生成getter、setter方法以及无参构造函数。 还要添加spring-boot-starter-validation依赖,用于数据校验。
添加spring-boot-starter-validation依赖
1 | <dependency> |
添加依赖后,可以在实体类中使用@NotNull、@NotBlank等注解进行数据校验。
@NotBlank 是一个用于字段校验的注解,主要用于确保字符串类型的字段值既不是 null,也不是全空白字符(即长度必须大于 0,且至少包含一个非空白字符)。
这里注意一点,在Book Entity中,LocalDate使用了@NotNull,而非@NotBlank。这是因为LocalDate是一个日期类型,通常情况下不应该为空(除非你有特定的业务逻辑允许其为null),所以使用@NotNull更为合适。
五、 创建controller类
1 | package com.example.controller; |

基本的springboot查询图书数据已经构建起来了。现在我们要对其进行改造成具备MCP服务的能力,需要以下步骤:
一、在pom.xml中导入依赖
因为要调用deepseek,所以需要导入这三个依赖项,因为deepseek是基于openai的模型构建的,所以需要这两个依赖项来调用openai服务,当然也可以使用Anthropic的模型,但是Anthropic的模型api是收费的,有限制,调用后会返回403
1 | <!--Spring AI核心依赖 --> |
由于目前这些依赖还是预览版本,所以在Maven中央仓库中是找不到的,需要我们额外引入仓库地址。
1
2
3
4
5
6
7
8
9
10
11
12
13
14
15
16
17
18
19
20
21
22
23
24
25
26
27
28
29<repositories>
<repository>
<id>spring-milestones</id>
<name>Spring Milestones</name>
<url>https://repo.spring.io/milestone</url>
<snapshots>
<enabled>false</enabled>
</snapshots>
</repository>
<repository>
<id>spring-snapshots</id>
<name>Spring Snapshots</name>
<url>https://repo.spring.io/snapshot</url>
<releases>
<enabled>false</enabled>
</releases>
</repository>
<repository>
<name>Central Portal Snapshots</name>
<id>central-portal-snapshots</id>
<url>https://central.sonatype.com/repository/maven-snapshots/</url>
<releases>
<enabled>false</enabled>
</releases>
<snapshots>
<enabled>true</enabled>
</snapshots>
</repository>
</repositories>
二、引入配置
目的是将一个Spring服务改造成MCP服务,所以这里不需要进行客户端的配置,同理,在引入依赖的时候也不用引入客户端的依赖。
1
2
3
4
5
6
7
8
9
10
11
12
13
14
15
16# OpenAI配置
spring.ai.openai.api-key="你的token"
spring.ai.openai.base-url=https://api.siliconflow.cn
spring.ai.openai.chat.options.model=Qwen/QwQ-32B
spring.ai.openai.chat.options.temperature=0.8
spring.ai.openai.chat.completions-path=/v1/chat/completions
spring.ai.openai.chat.options.stream-usage=false
# MCP服务端开启
spring.ai.mcp.server.enabled=true
# MCP服务端配置
spring.ai.mcp.server.name=book-management-server
spring.ai.mcp.server.version=1.0.0
spring.ai.mcp.server.type=SYNC
spring.ai.mcp.server.sse-message-endpoint=/mcp/message
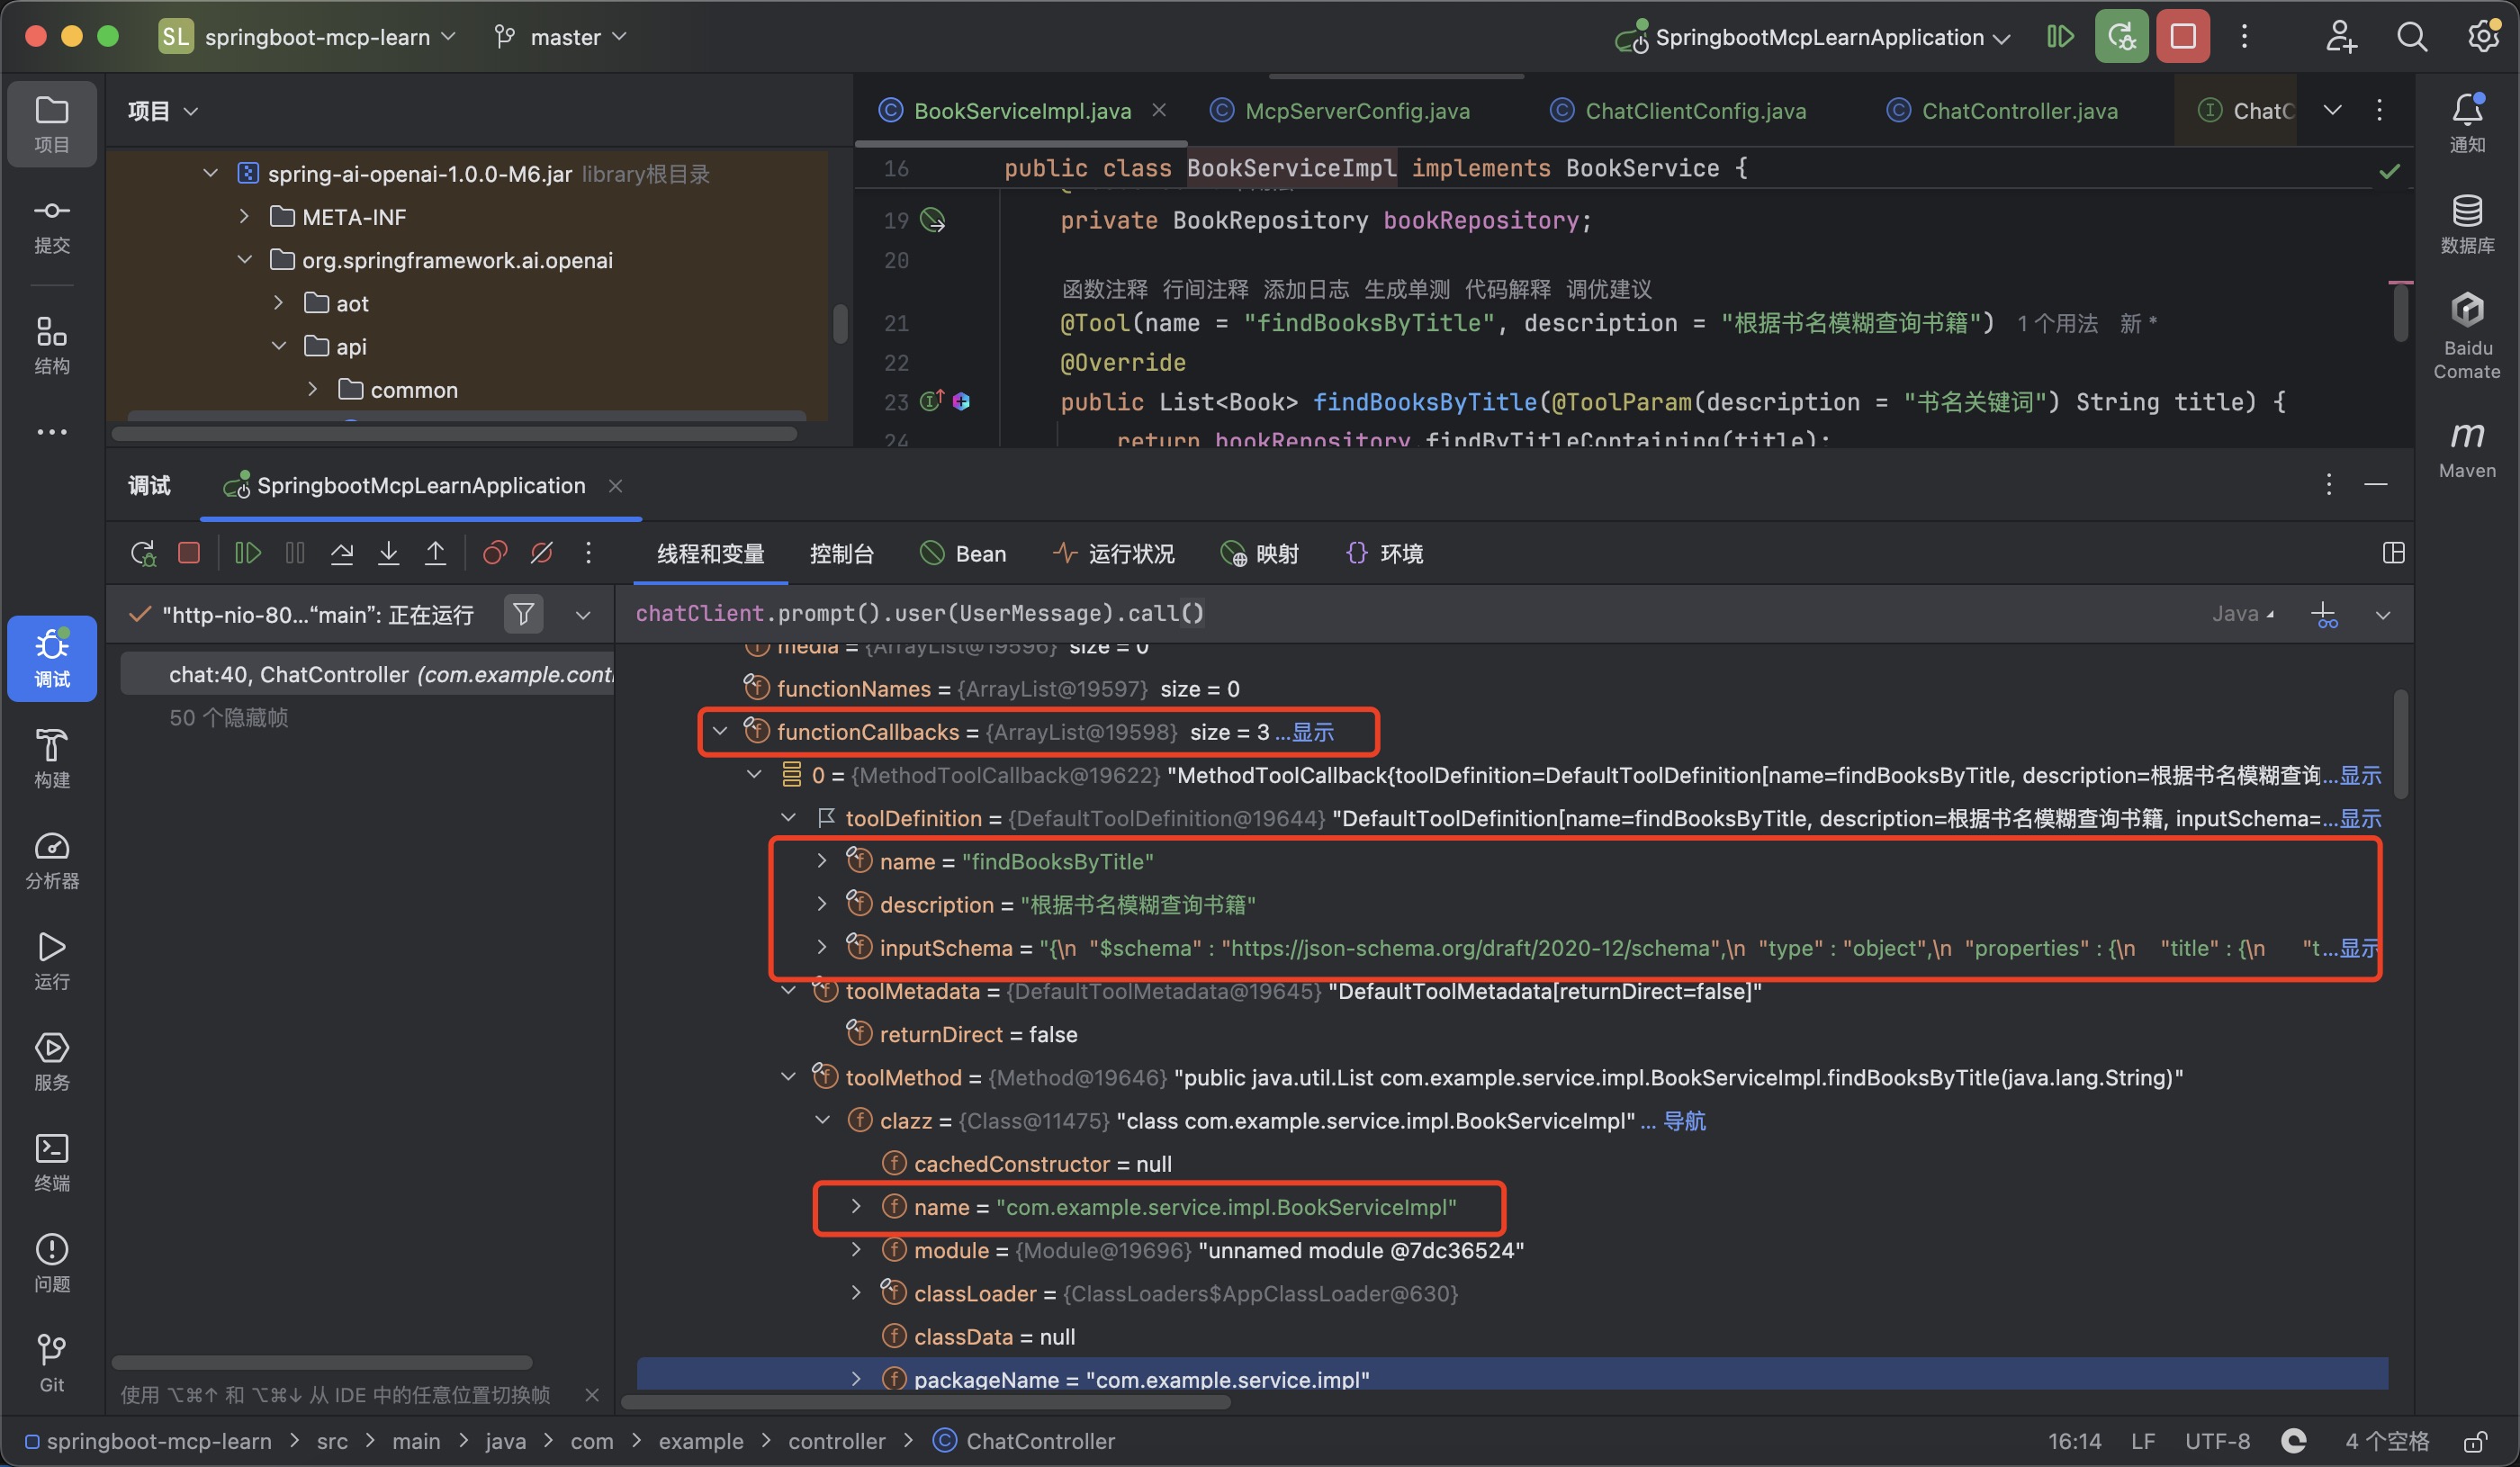
工具配置方式在需要改造的实现类对需要改造的方法加上@Tool和@ToolParam注解分别标记方法和参数。
1
2
3
4
5
6
7
8
9
10
11
12
13
14
15
16
17
18
19
20
21
22
23
24
25
26
27
28
29
30
31
32
33
34
35
36
37
38import com.example.entity.Book;
import com.example.repository.BookRepository;
import com.example.service.BookService;
import jakarta.annotation.Resource;
import lombok.RequiredArgsConstructor;
import org.springframework.ai.tool.annotation.Tool;
import org.springframework.ai.tool.annotation.ToolParam;
import org.springframework.stereotype.Service;
import java.util.List;
publicclass BookServiceImpl implements BookService {
private BookRepository bookRepository;
public List<Book> findBooksByTitle( String title) {
return bookRepository.findByTitleContaining(title);
}
public List<Book> findBooksByAuthor( String author) {
return bookRepository.findByAuthor(author);
}
public List<Book> findBooksByCategory(String category) {
return bookRepository.findByCategory(category);
}
}
1 | package com.example.mcp.config; |
此时在聊天客户端配置引入注册工具即可。 1
2
3
4
5
6
7
8
9
10
11
12
13
14
15
16
17
18
19
20
21
22
23
24
25
26
27
28
29
30import org.springframework.ai.chat.client.ChatClient;
import org.springframework.ai.tool.ToolCallbackProvider;
import org.springframework.beans.factory.annotation.Autowired;
import org.springframework.context.annotation.Bean;
import org.springframework.context.annotation.Configuration;
/**
* 聊天客户端配置类
*/
publicclass ChatClientConfig {
private ToolCallbackProvider toolCallbackProvider;
/**
* 配置ChatClient,注册系统指令和工具函数
*/
public ChatClient chatClient(ChatClient.Builder builder) {
return builder
.defaultSystem("你是一个图书管理助手,可以帮助用户查询图书信息。" +
"你可以根据书名模糊查询、根据作者查询和根据分类查询图书。" +
"回复时,请使用简洁友好的语言,并将图书信息整理为易读的格式。")
// 注册工具方法
.defaultTools(toolCallbackProvider)
.build();
}
}
除了上述的方式,还可以单独声明一个类将查询方法作为函数Bean导出。
1
2
3
4
5
6
7
8
9
10
11
12
13
14
15
16
17
18
19
20
21
22
23
24
25
26
27
28
29
30
31
32
33
34
35
36
37
38
39
40
41
42
43
44import com.example.entity.Book;
import com.example.service.BookService;
import jakarta.annotation.Resource;
import org.springframework.context.annotation.Bean;
import org.springframework.stereotype.Service;
import java.util.List;
import java.util.function.Function;
/**
* 图书查询服务,将查询方法作为函数Bean导出
*/
publicclass BookQueryService {
private BookService bookService;
/**
* 根据书名查询图书的函数Bean
*/
public Function<String, List<Book>> findBooksByTitle() {
return title -> bookService.findBooksByTitle(title);
}
/**
* 根据作者查询图书的函数Bean
*/
public Function<String, List<Book>> findBooksByAuthor() {
return author -> bookService.findBooksByAuthor(author);
}
/**
* 根据分类查询图书的函数Bean
*/
public Function<String, List<Book>> findBooksByCategory() {
return category -> bookService.findBooksByCategory(category);
}
}
采用这种方式在定义AI聊天客户端的时候需要显式地声明。
1 | import org.springframework.ai.chat.client.ChatClient; |
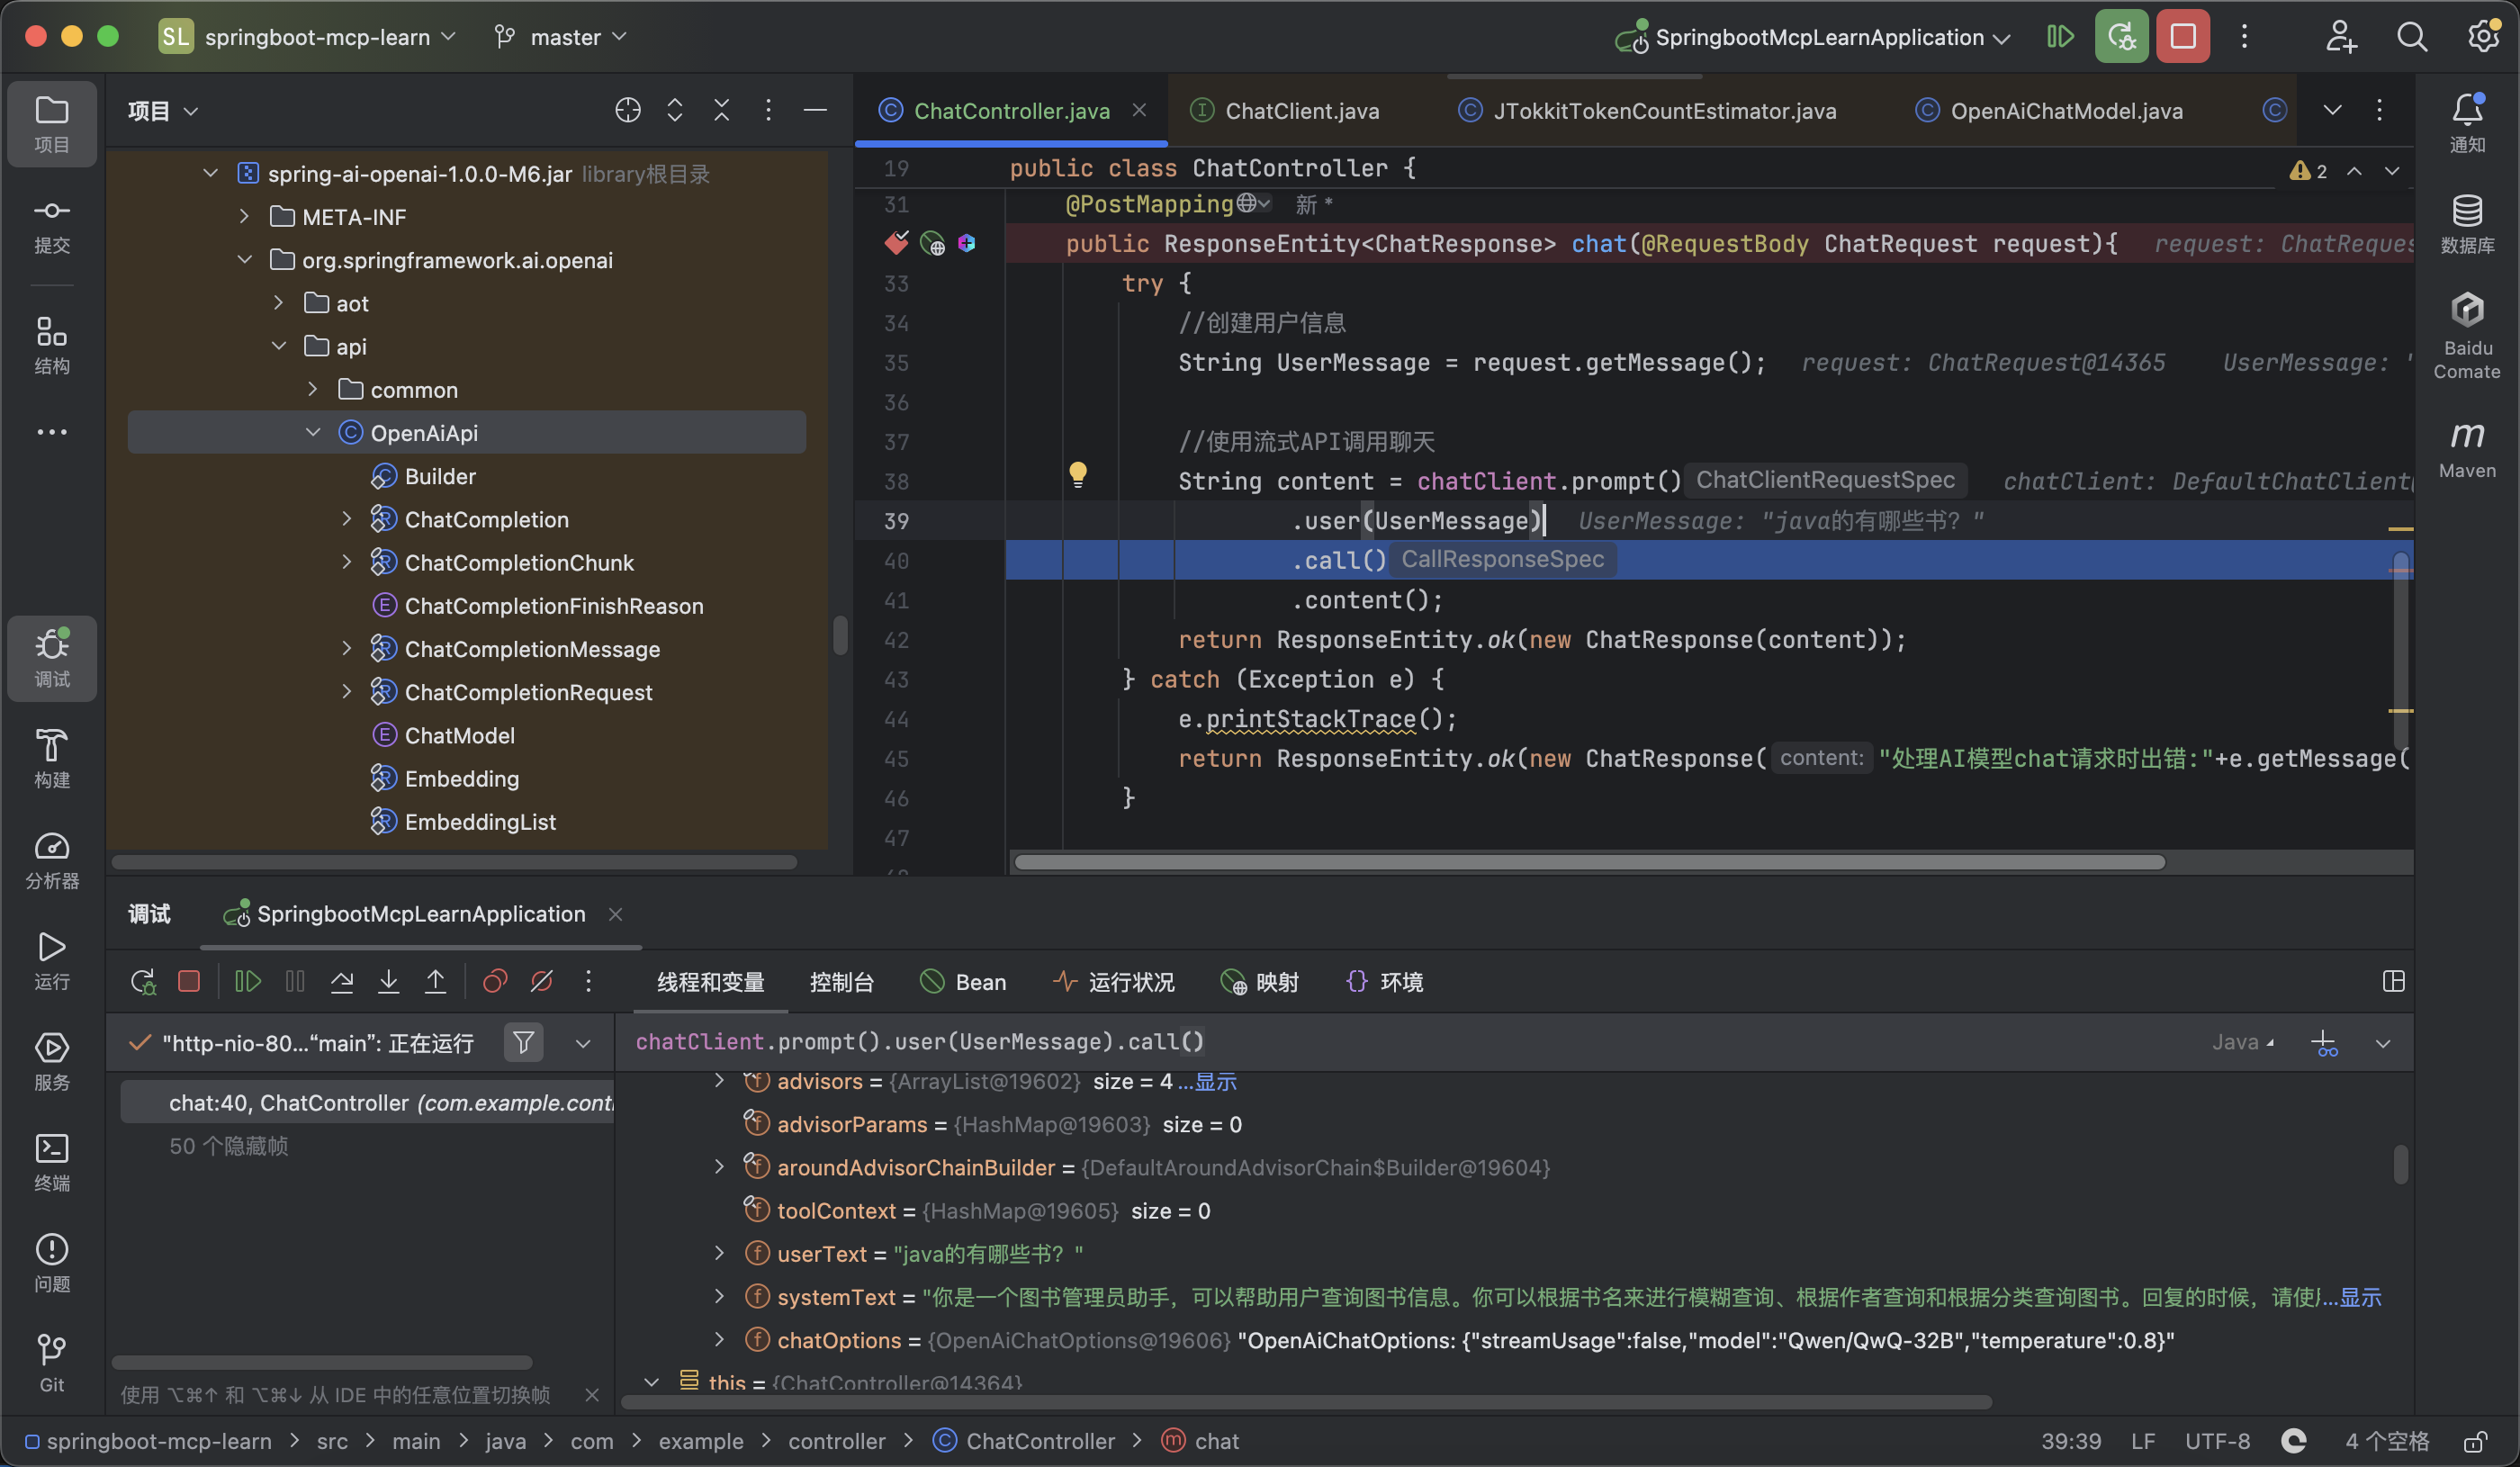
4.接口测试
完成了服务开发后,就可以声明一个控制器对外暴露进行调用。
1 | import com.example.model.ChatRequest; |
为了方便测试,开发一个数据初始化器,通过实现CommandLineRunner接口,它会在的应用程序启动时自动向数据库中加载这些测试数据。
1
2
3
4
5
6
7
8
9
10
11
12
13
14
15
16
17
18
19
20
21
22
23
24
25
26
27
28
29
30
31
32
33
34
35
36
37
38
39
40
41
42
43
44
45
46
47
48
49
50
51
52import com.example.entity.Book;
import com.example.repository.BookRepository;
import jakarta.annotation.Resource;
import lombok.RequiredArgsConstructor;
import org.springframework.boot.CommandLineRunner;
import org.springframework.stereotype.Component;
import java.time.LocalDate;
import java.util.Arrays;
import java.util.List;
publicclass DataInitializer implements CommandLineRunner {
private BookRepository bookRepository;
public void run(String... args) throws Exception {
// 准备示例数据
List<Book> sampleBooks = Arrays.asList(
new Book(null, "Spring实战(第6版)", "编程", "Craig Walls",
LocalDate.of(2022, 1, 15), "9787115582247"),
new Book(null, "深入理解Java虚拟机", "编程", "周志明",
LocalDate.of(2019, 12, 1), "9787111641247"),
new Book(null, "Java编程思想(第4版)", "编程", "Bruce Eckel",
LocalDate.of(2007, 6, 1), "9787111213826"),
new Book(null, "算法(第4版)", "计算机科学", "Robert Sedgewick",
LocalDate.of(2012, 10, 1), "9787115293800"),
new Book(null, "云原生架构", "架构设计", "张三",
LocalDate.of(2023, 3, 15), "9781234567890"),
new Book(null, "微服务设计模式", "架构设计", "张三",
LocalDate.of(2021, 8, 20), "9789876543210"),
new Book(null, "领域驱动设计", "架构设计", "Eric Evans",
LocalDate.of(2010, 4, 10), "9787111214748"),
new Book(null, "高性能MySQL", "数据库", "Baron Schwartz",
LocalDate.of(2013, 5, 25), "9787111464747"),
new Book(null, "Redis实战", "数据库", "Josiah L. Carlson",
LocalDate.of(2015, 9, 30), "9787115419378"),
new Book(null, "深入浅出Docker", "容器技术", "李四",
LocalDate.of(2022, 11, 20), "9787123456789")
);
// 保存示例数据
bookRepository.saveAll(sampleBooks);
System.out.println("数据初始化完成,共加载 " + sampleBooks.size() + " 本图书");
}
}
Spring-AI-openai使用deepseek接口的时候报错404
解决办法:在配置文件中添加: completions-path: /chat/completions
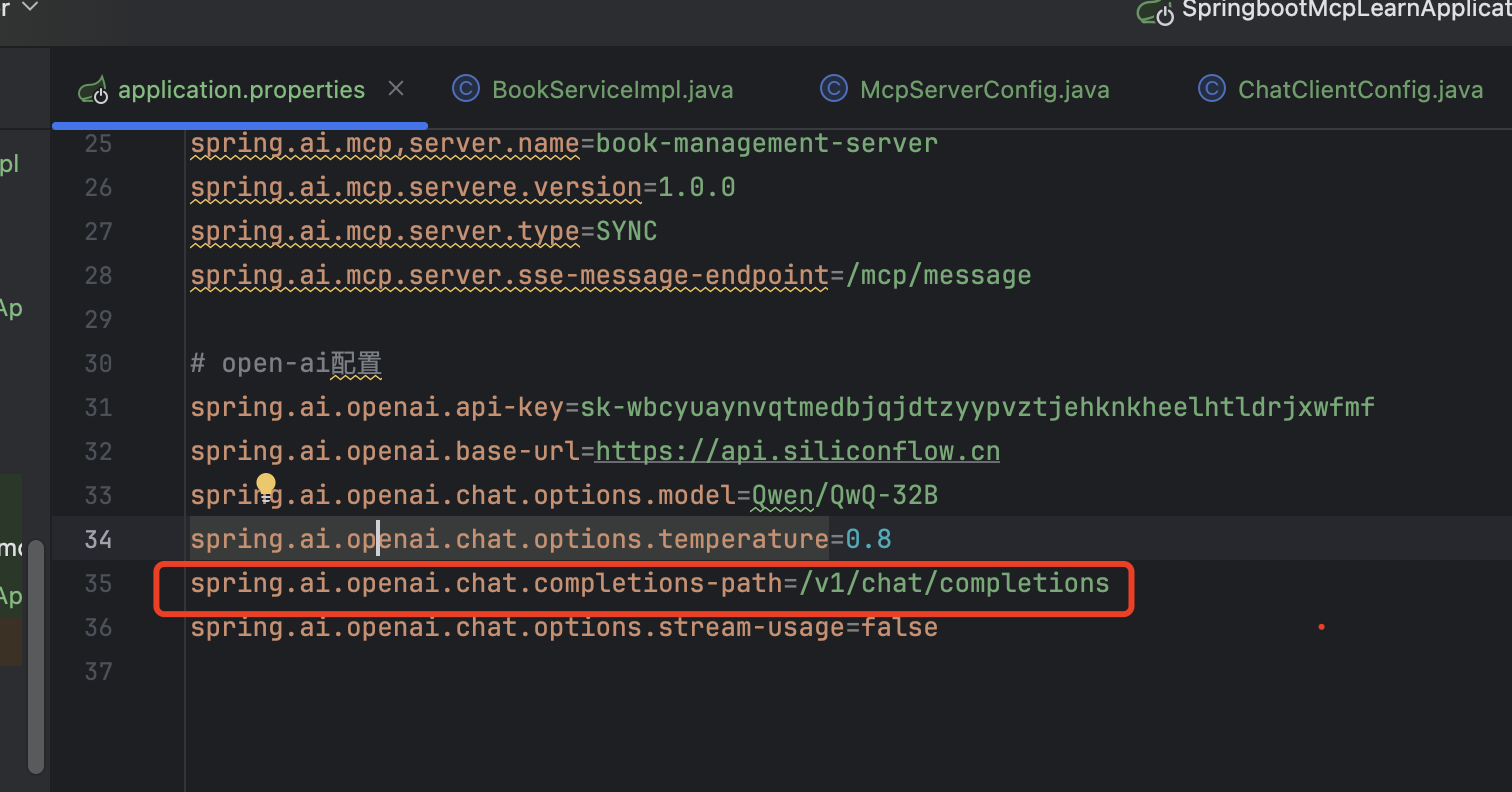
原因:在OpenAiChatModel中有个OpenAiApi,在发起请求时会默认添加
/v1/chat/completions 作为请求路径 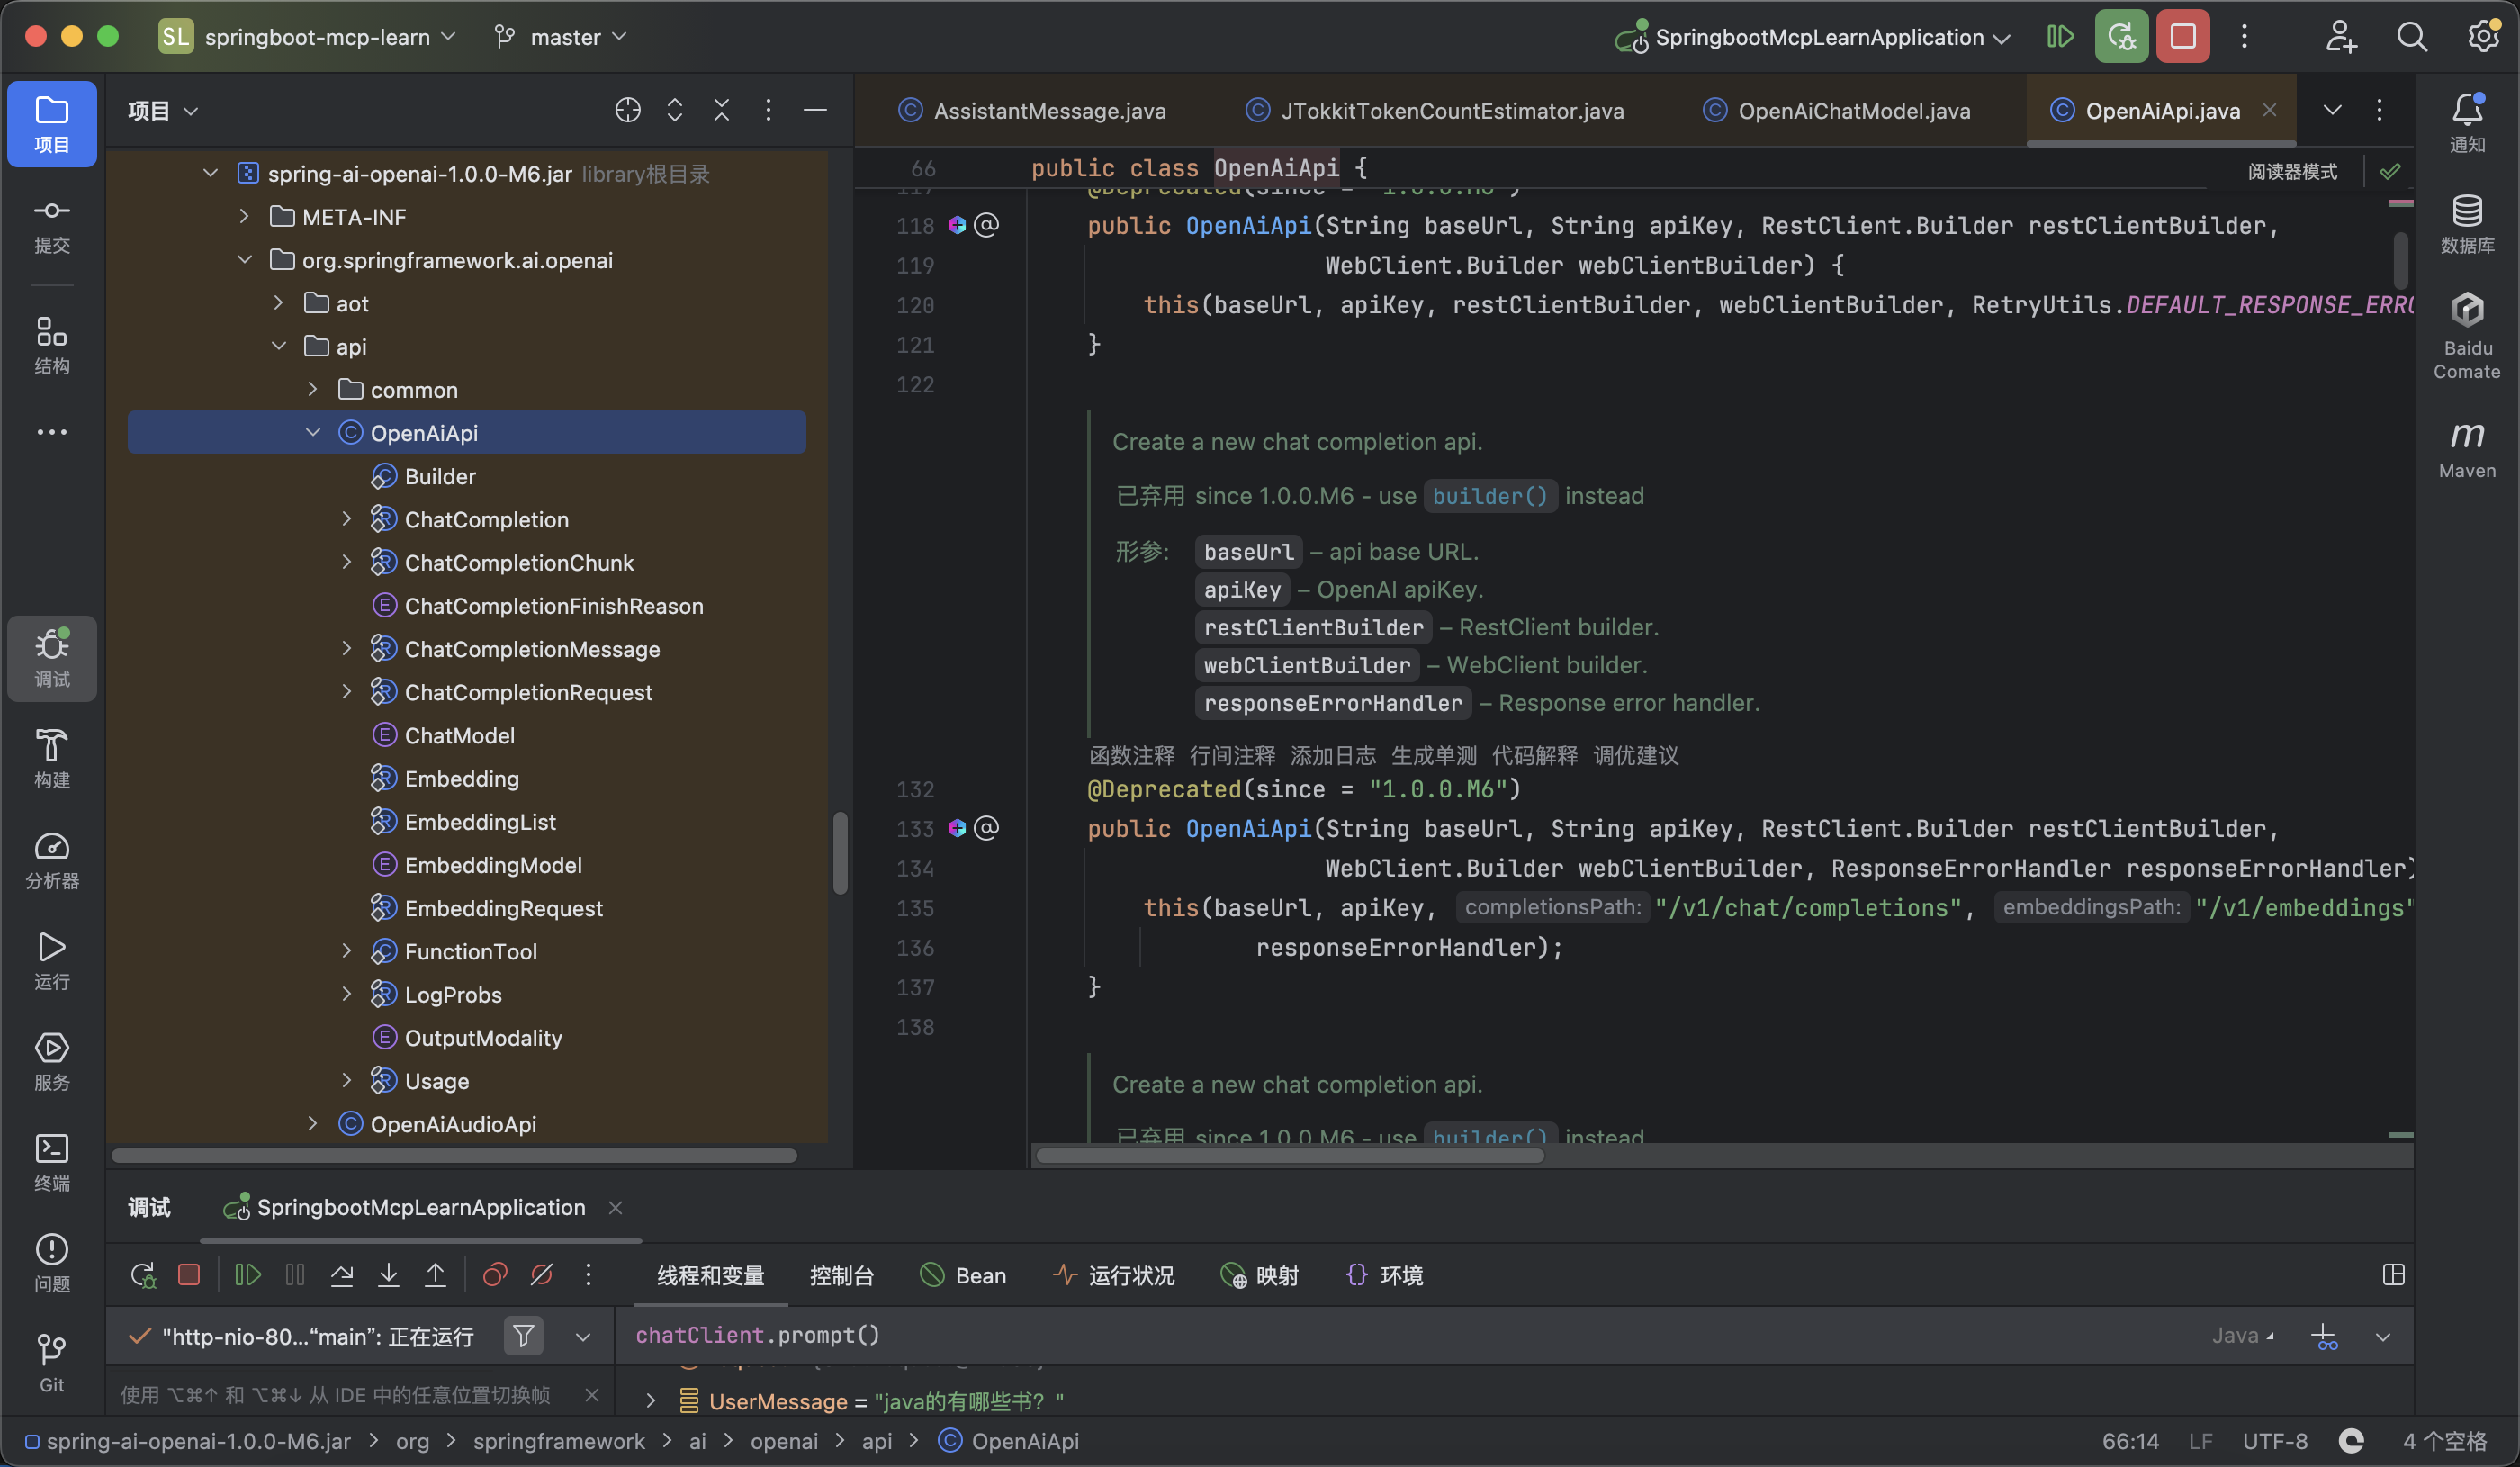
小结
 当用户的query不同时,会根据定义的三种方法:findBooksByTitle、findBooksByAuthor和findBooksByCategory,来调用对应的函数。
这里怀疑是将三种方法和query结合成上下文提示词扔给了llm,然后让llm来进行填充slot,这种形式很容易产生歧义性,那如果我想问一个复合问题,或者是问了书名和品类名,该如何处理?
当用户的query不同时,会根据定义的三种方法:findBooksByTitle、findBooksByAuthor和findBooksByCategory,来调用对应的函数。
这里怀疑是将三种方法和query结合成上下文提示词扔给了llm,然后让llm来进行填充slot,这种形式很容易产生歧义性,那如果我想问一个复合问题,或者是问了书名和品类名,该如何处理?
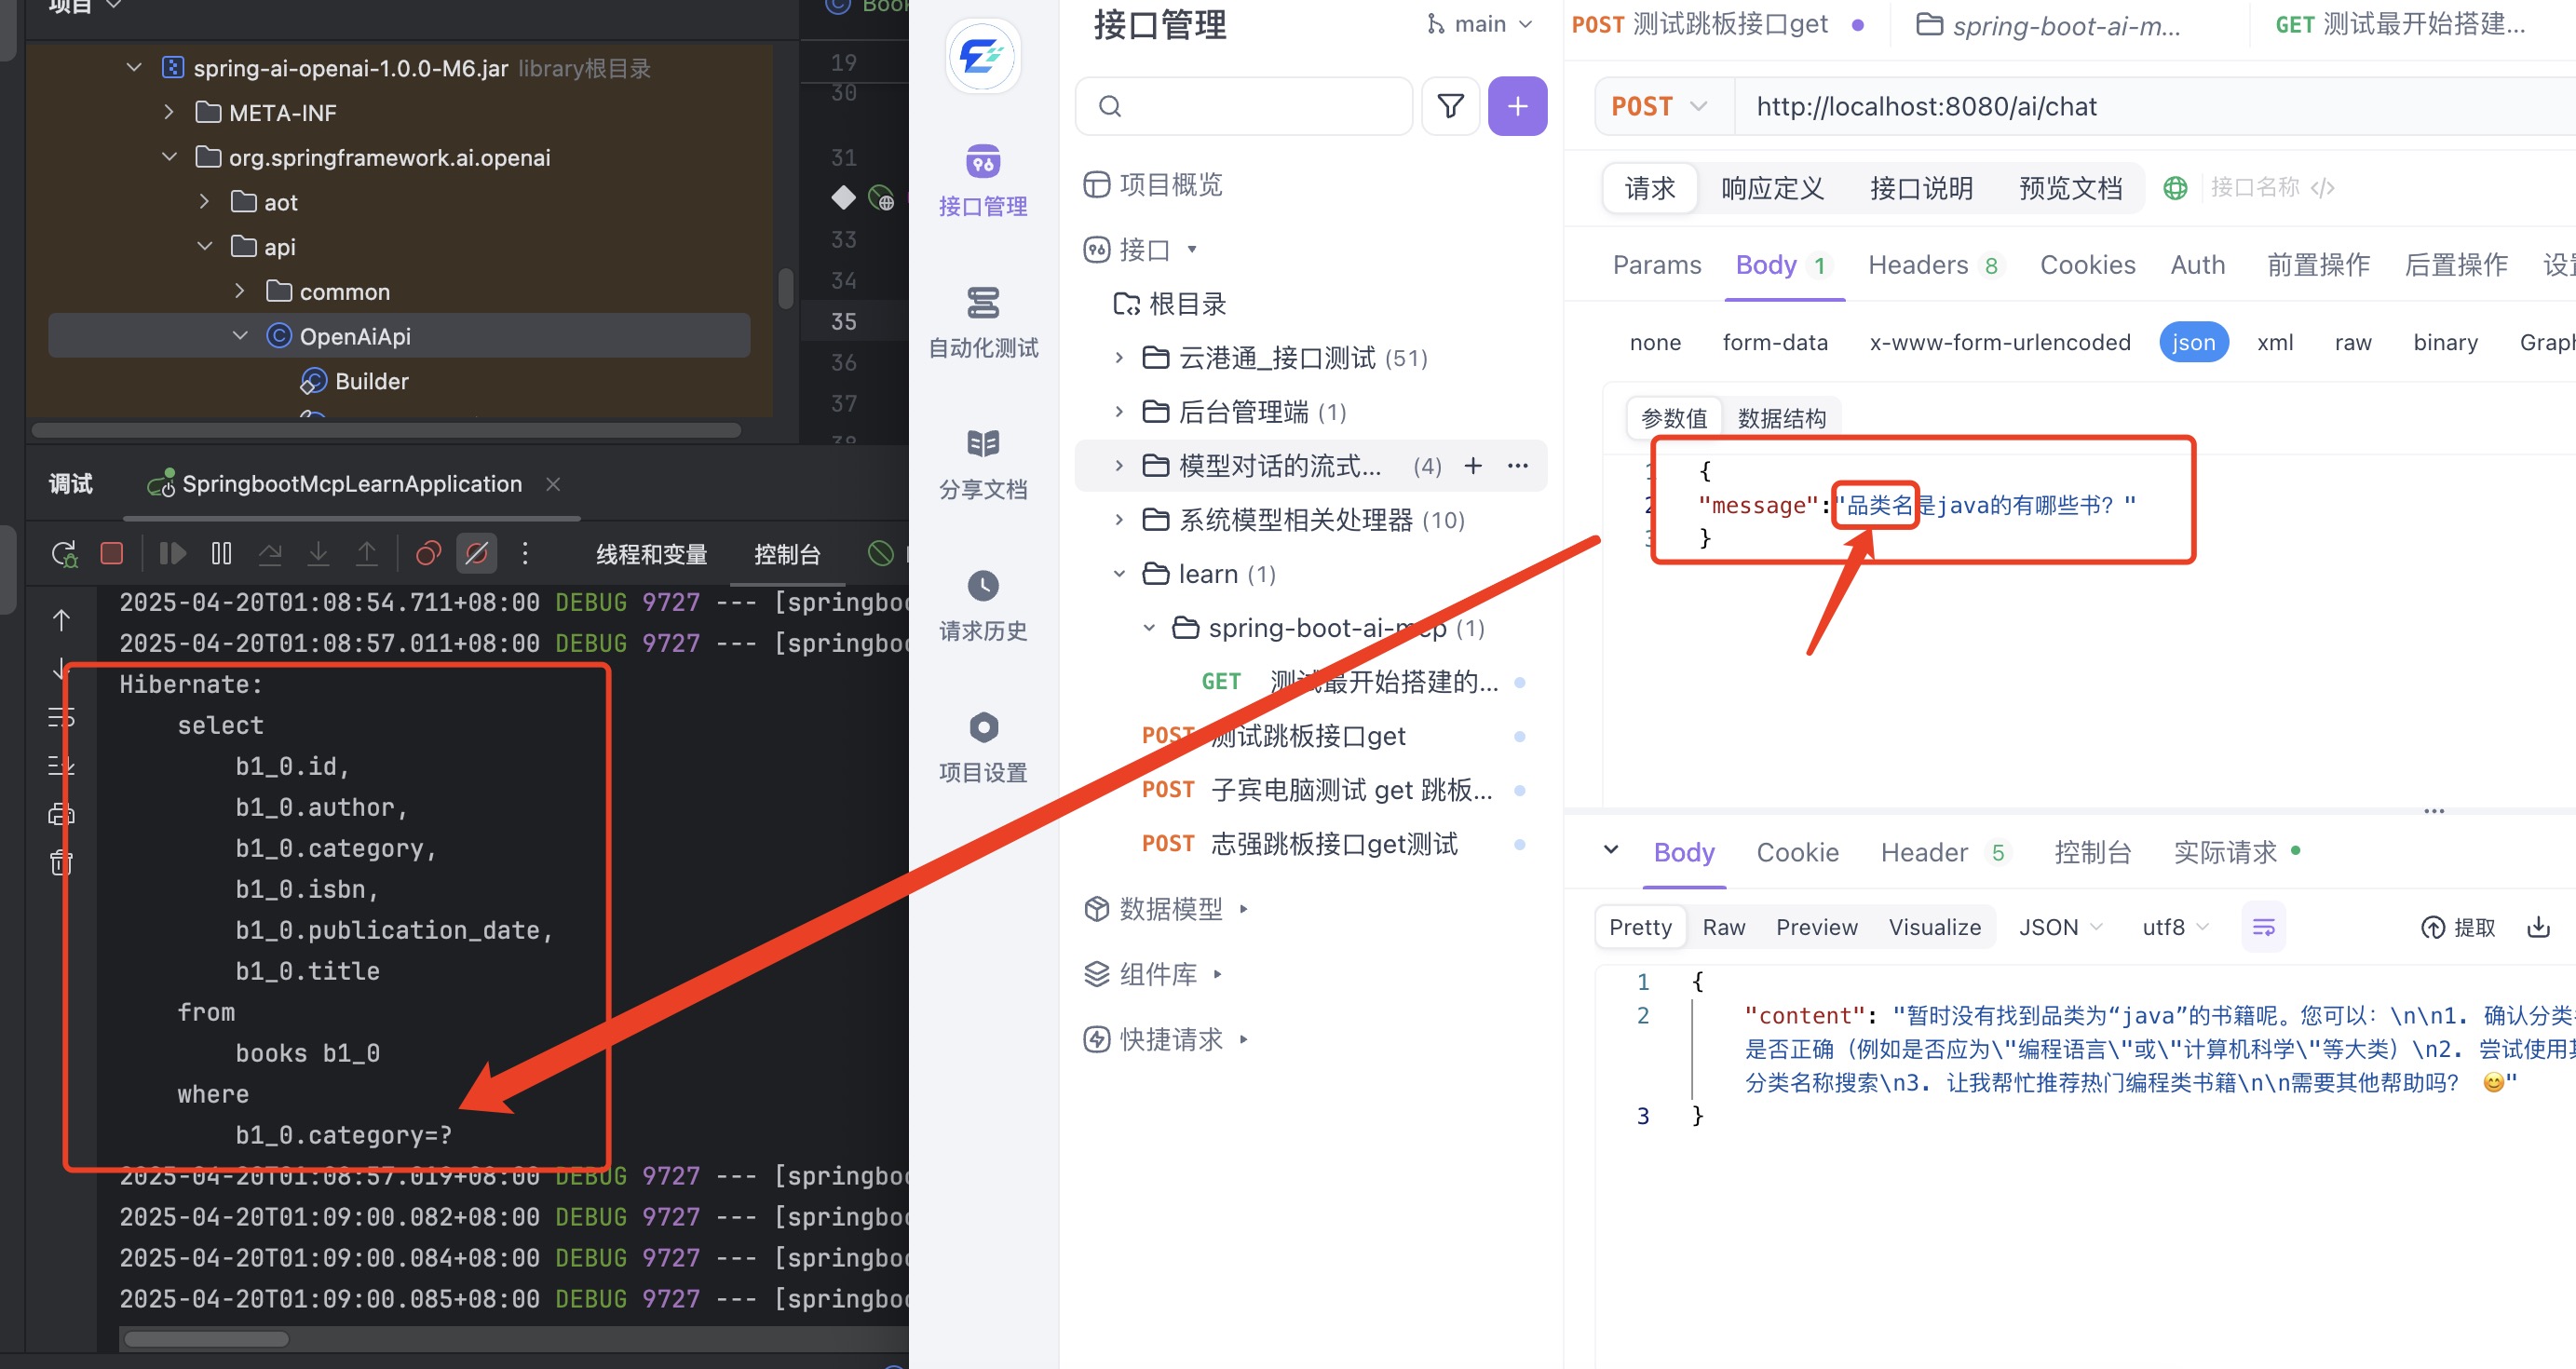
 果然,他会分步执行,写了两个sql语句进行查询。
这块还需要去大模型客户端查看下,到底输入给大模型拼接的上下文实际是什么,这样的话一目了然,也便于调试。
果然,他会分步执行,写了两个sql语句进行查询。
这块还需要去大模型客户端查看下,到底输入给大模型拼接的上下文实际是什么,这样的话一目了然,也便于调试。
待续跟进。
2025年4月20日01:20 夜